Are you an employer or a payroll administrator?
Here are some common questions QuickBooks for Windows employers have about ViewMyPaycheck.
 Note: These FAQs are for employers using QuickBooks for Windows product. If you use the Online Payroll service, check ViewMyPaycheck: Online Payroll Employers instead.
After you turn on ViewMyPaycheck your company, you simply run your payroll in QuickBooks and then upload the paycheck info to Intuit.
Your employees have their own sign-in credentials and can see their current paycheck info as well as any prior paychecks uploaded by their employer.
Yes, if you have QuickBooks 2012 or later. You'll need to install the latest maintenance release and payroll updates. But once you do, you'll have the option of turning on ViewMyPaycheck.
What if I'm using QuickBooks 2011?
IMPORTANT: If you have QuickBooks 2011, you'll need to upgrade your version of QuickBooks to use ViewMyPaycheck 2.
You bet! Just go to ViewMyPaycheck: Demo and explore the sample account we provided for you.
Here's what you need to do:
- Make sure you're using QuickBooks for Windows 2013, have installed the latest maintenance release and the latest payroll updates.
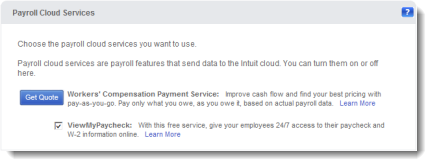
- Choose Employees > Manage Payroll Cloud Services.
If you don't see the Manage Payroll Cloud Services option, you don't have QuickBooks 2013 R9 with the latest payroll updates installed. - In the Payroll Cloud Services window, click the ViewMyPaycheck checkbox.
- When prompted, create or confirm a PIN used to send payroll data.
- Click Save Changes.
- Click Return To QuickBooks in the confirmation window.
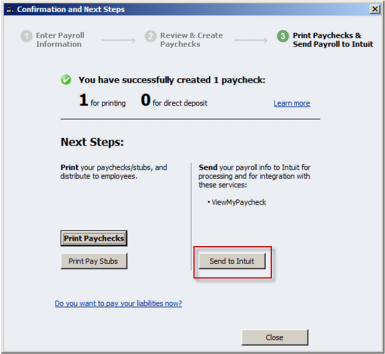
- Next time you run payroll, upload your paycheck info to Intuit when prompted.
Before employees can sign up for and access ViewMyPaycheck, you need to upload paychecks.
Yes! For information about the ViewMyPaycheck Company View, click here.
If you're the Payroll Administrator for your QuickBooks company, you need to sync your QuickBooks company with Intuit cloud services and connect to ViewMyPaycheck. You just need to do this once, but as soon as you do, you can assign administrator access to others. Here's how:
- Sign in to your QuickBooks company as the admin.
- Open your QuickBooks company file and sign in as the QuickBooks company admin.
- Click Employees > Manage Payroll Cloud Services.
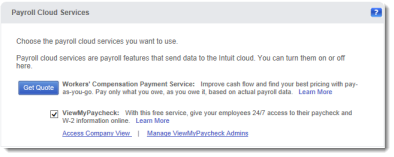
- In the Payroll Cloud Services window, make sure that the ViewMyPaycheck option is selected and then click Manage ViewMyPaycheck Admins.
- In the QuickBooks Payroll window, enter the same Intuit account ID and password that you used to sync your QuickBooks company and click Sign In.
- On the Manage users page, click Invite Others.
- Enter the email address, first and last name of the person you want to invite.
- Click Send.
- Close the confirmation window.
When the new ViewMyPaycheck administrator accepts the invitation, they'll be able to sign in to ViewMyPaycheck, see all the employee paychecks that have been uploaded to ViewMyPaycheck and manage employee preferences.
Sure! For information, go to View W-2s in ViewMyPaycheck.
Currently we don't offer a native mobile app you can download from the App Store or Google Play. However, ViewMyPaycheck is optimized for mobile devices. Just open your mobile browser and go to https://paychecks.intuit.com/.
If you have questions about using ViewMyPaycheck, click the question mark icons (?) available on the ViewMyPaycheck website.
If you need more help, give us a shout!
First, sign up for ViewMyPaycheck, and then run a payroll and send paychecks to Intuit. (Before employees can sign up for and access ViewMyPaycheck, you need to upload paychecks.)
Then send your employees these instructions for signing up and using ViewMyPaycheck.
After you sign up ViewMyPaycheck for your company, there are a couple of ways to get paychecks from QuickBooks to ViewMyPaycheck: you can send paychecks after every payroll or upload prior, historical paychecks.
Upload paychecks after every payroll
Every time you run payroll, you can upload your payroll info to Intuit.
Upload prior (historical) paychecks
You can also upload paychecks from prior payrolls (also called historical paychecks). We recommend uploading paychecks for the current calendar year and in batches of 100-200 paychecks at a time to prevent any errors.
To do so:
- If this is the first time you're sending paychecks to ViewMyPaycheck, be sure to send a zero payroll or send a scheduled or pending payroll to Intuit.
Important! To prevent upload errors, do not upload historical paychecks if you have a pending payroll. - Select File > Print > Print Paystubs
- In the Checks Dated fields, pick the date range you want to include in the upload.
- Make sure that the checks appear and are selected in the paycheck list.
- Click Send Online.
- In the Send/Receive Data window, click Send All and provide your payroll PIN.