Already using ViewMyPaycheck
(Version 1)?
IMPORTANT: Effective May 31, 2014, ViewMyPaycheck 1 is no longer available.
Thanks for being a loyal ViewMyPaycheck customer! We've made lots of great improvements in ViewMyPaycheck 2 based on suggestions from customers just like you. So check out some of the features, take it for a test drive (opens in a new window), and let us know what you think about it!
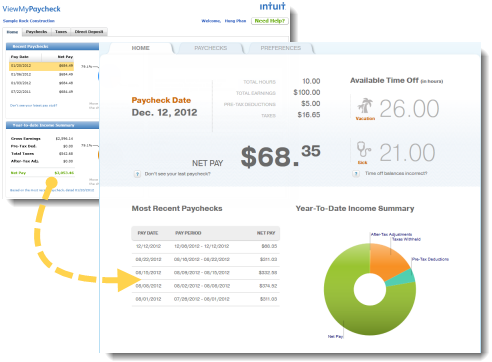
ViewMyPaycheck 2 provides employees with a new web portal that no longer requires a Flash plug-in or a separate address for employees using mobile devices. It's easier for employees to set up accounts because they don’t have to match an email address you sent in an invitation. And each employee controls whether or not to get a notification when new paychecks are available.
ViewMyPaycheck also makes life easier for you, the employer. You send paychecks after each payroll run in just two clicks. No more signing in to upload data. And you don’t need to invite employees. Just point them to the new web portal address.
Ready to switch to ViewMyPaycheck 2? Here's what you need to do.
(You only need to do this once!)
- Install the latest QuickBooks* maintenance release and payroll updates. How?
- Open your QuickBooks company file.
- Go to the Help menu and choose Update QuickBooks.
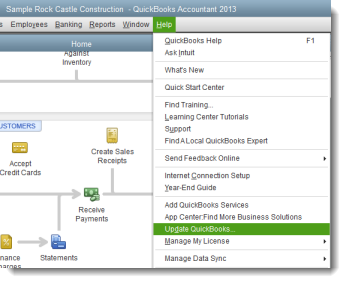
- Follow the onscreen instructions.
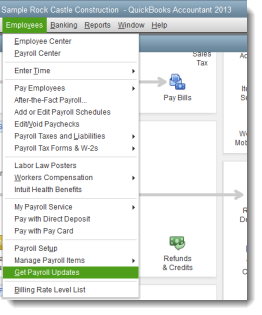
- In your QuickBooks company file, go to the Employees menu and choose Get Payroll Updates.
- Click Update (or Download Latest Update, if you're a disk delivery customer) to download the payroll update.
A progress bar appears indicating that the payroll update is downloading. - If necessary, close and then reopen QuickBooks.
- Turn on ViewMyPaycheck in QuickBooks. How?
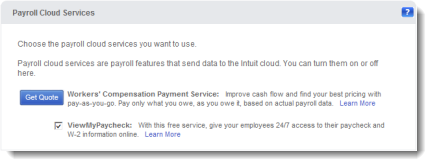
- In your QuickBooks company file, go to the Employees menu and choose Manage Payroll Cloud Services.
Tip: If this menu item doesn't appear in the Employees menu, you may not have the latest release or payroll update. - Check the box for ViewMyPaycheck.
- When prompted, create a payroll service PIN to use when you send pay stub information to Intuit and re-enter the PIN to confirm it. Then click Save Changes.
Tip: If you already have a payroll service PIN for Assisted Payroll or for direct deposit, QuickBooks just prompts you to confirm your existing PIN. - Upload the current year's paychecks to ViewMyPaycheck. How?

- Go to the File menu and click Print Forms > Pay Stubs.
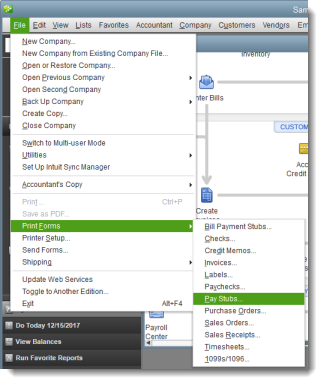
- Enter a date range for the paychecks, or filter them by employee.
- Select the paychecks you want to send to ViewMyPaycheck, and click Send Online.
- On the Send/Receive Data window, click Send.
- When prompted, enter your payroll service PIN.
- Have employees start using the new ViewMyPaycheck portal.
- Once you've switched, all you need to do is run payroll as usual and click Send to Intuit to upload employee checks to ViewMyPaycheck.
- In your QuickBooks company file, create paychecks as you normally do.
- On the Confirmation and Next Steps screen, in addition to printing checks, be sure to click Send to Intuit.
- On the Send/Receive Data window, click Send.
- When prompted, enter your payroll service PIN.
Tip: If you ever forget to click the Send to Intuit button, you can always go to the Employees menu and click Send Payroll to Intuit.
To install the latest QuickBooks maintenance release:
To get the latest payroll update:
We recommend that you upload the current year's paycheck info (from Jan 1, 2014 to today). And don't forget to include the most recent paychecks. As a security measure when employees up for ViewMyPaycheck, we'll ask them for the net amount from their last paycheck.
To upload paycheck info:
Tip: To reduce the time it takes to send paycheck info and minimize the chances of transmission errors, we recommend that you send no more than 100 to 250 paychecks at a time.
Once you start sending paycheck information to Intuit for ViewMyPaycheck, just give your employees the website address: https://paychecks.intuit.com/.
Employees use their existing Intuit account ID and password (if they have one) or sign up for a new account. The first time they access their paychecks, they also need to enter their Social Security number and the net amount of their most recent paycheck.
Get a printed version (PDF) of these instructions.
To upload paycheck info after every payroll:
Note: For a printable version of these instructions, check out the Quick Guide: ViewMyPaycheck. (PDF)
Have more questions? Check out our FAQs or contact us!
* Supported QuickBooks Versions: QuickBooks 2012 (and later)
If you have QuickBooks 2011, you'll need to upgrade your version of QuickBooks to use ViewMyPaycheck 2.