Getting Around In The New QuickBooks
What's New in QuickBooks
We’ve made some changes to QuickBooks, all based on input from you, our users. This guide gives you a roadmap to those changes. Let’s get started.
The Roadmap: What's New
A Quick Overview
Navigation Points
The Navigation Bar
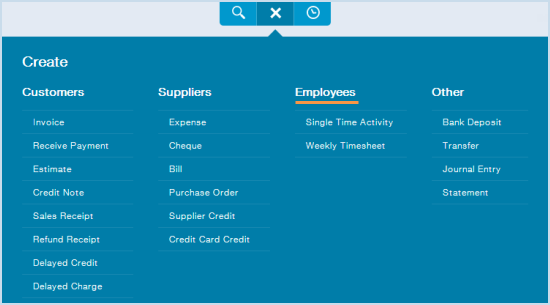
The Create (+) Menu: Your Source for All Forms
The Gear: Your Toolbox
Where Do I Find?
The New Customer Centre Page
The New Suppliers Centre Page
My Employees
My Banking
Income List
My Reports
My Lists
The Shortcut Keys
THE ROADMAP: WHAT'S NEW
A Quick Overview
First, you will notice some organisational changes.
We want to make sure you can do the same work in the new QuickBooks that you did before (and we will help you if you have any difficulty). It will not take long for you to get comfortable, and you will see how the new QuickBooks can make your work much easier.
Here are some important navigation points. We call them:
 The navigation bar
 The Create (+) menu
 The Gear icon
We’re going to guide you through each of them, so you understand what they are and why we’ve made these changes.
NAVIGATION POINT
The Navigation Bar
The navigation bar, on the left side of the page, has the items that you used to see in tabs lined across the top of the page (Customers, Suppliers, Employees, and so on).
You used to have to select a tab and then click on a menu, but now it takes just one click to see how your business is doing, what you’ve done, and choose what you want to do next. Try it for customers, suppliers, employees, and transactions.
Here are two examples:
-
Click Customers to create a new invoice for a customer, or review a customer’s history with you over time.
-
Click Transactions to review your banking information, or manage your accounts (with no need for to click between tabs, like in the old QuickBooks).
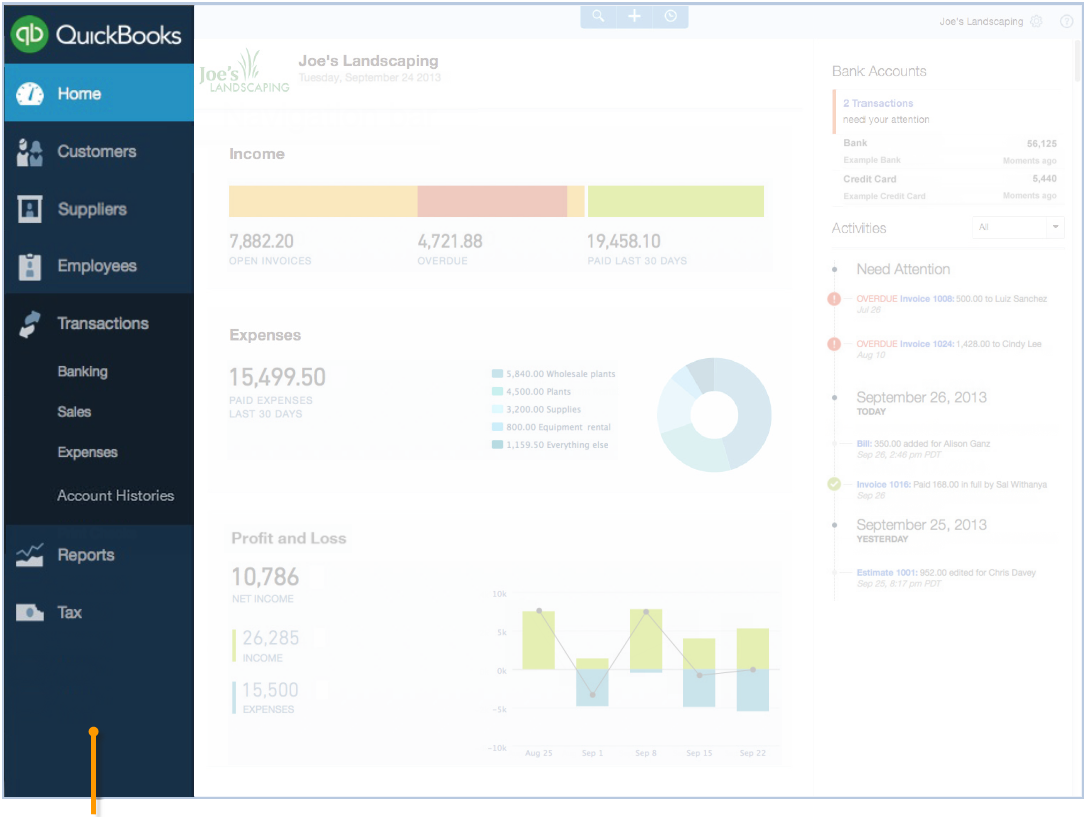
NAVIGATION BAR
NAVIGATION POINT
The Create (+) Menu: Your Source for All Forms
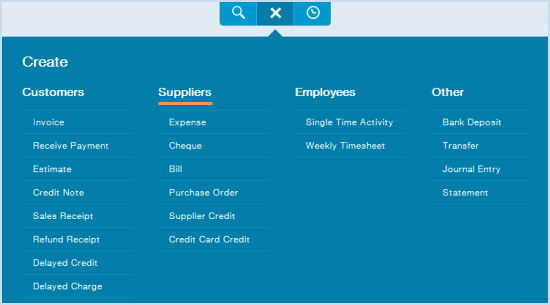
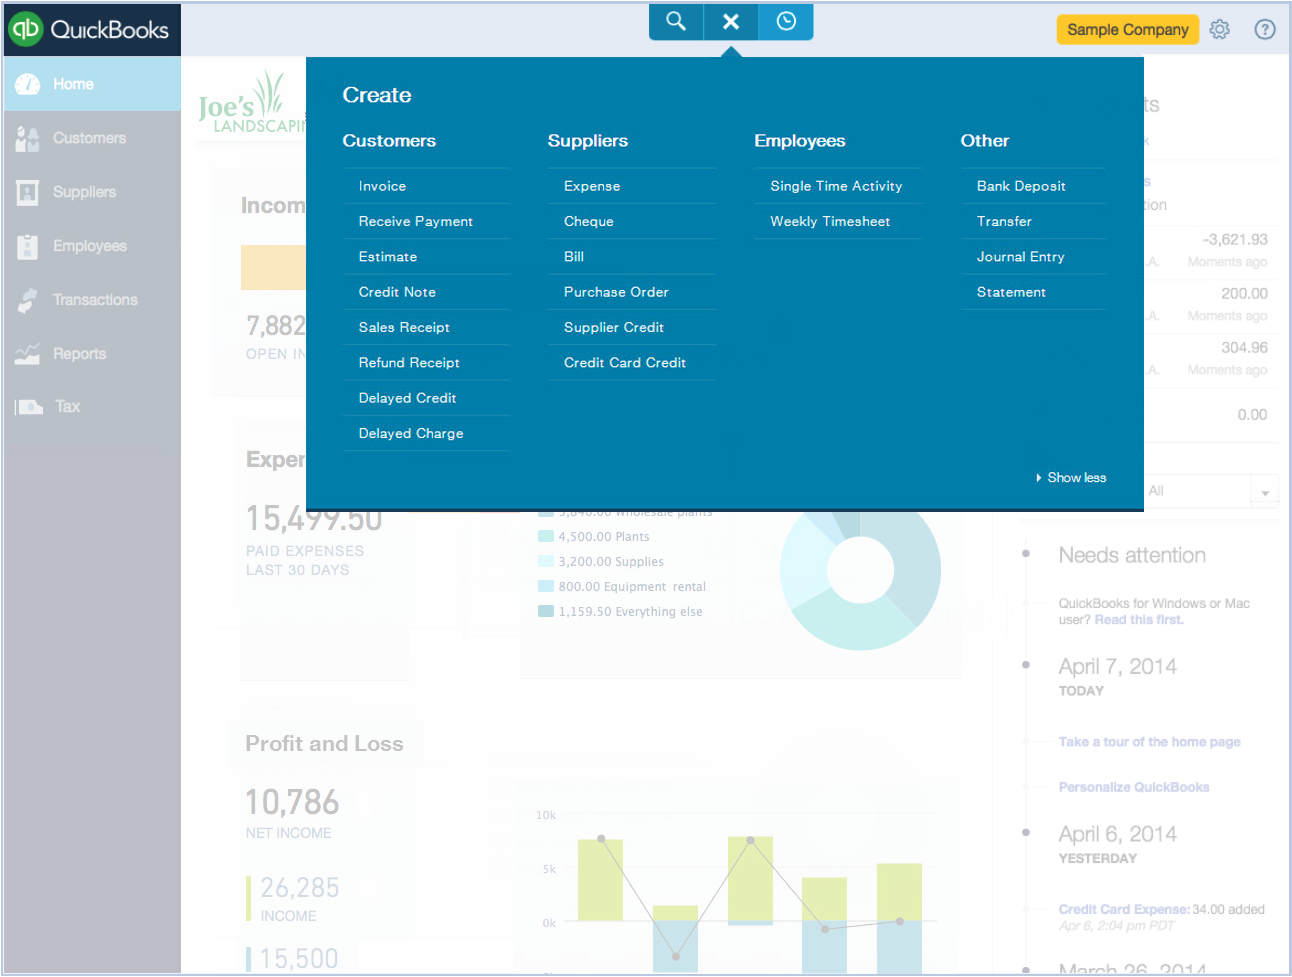
Use the (+) to start anything new for anyone you work with: customers, suppliers, employees, and so on. Here’s a small sample of what you can do:
-
For customers you can create an invoice, receive a payment, set up an estimate, and more.
-
For your suppliers you can record an expense, cheque, or bill, and more.
-
For employees, you can set up a single time activity, or a weekly timesheet.
-
You can even review bank deposits, transfer funds, make a journal entry, and create and send statements.
 QUICK TIPS
- For Statement, look at the last link under Other, on the far right side of the menu.
- If the Create menu is “collapsed” when you open it (and doesn’t show all of the options), just click Show more to open the full menu.
NAVIGATION POINT
The Gear: Your Toolbox
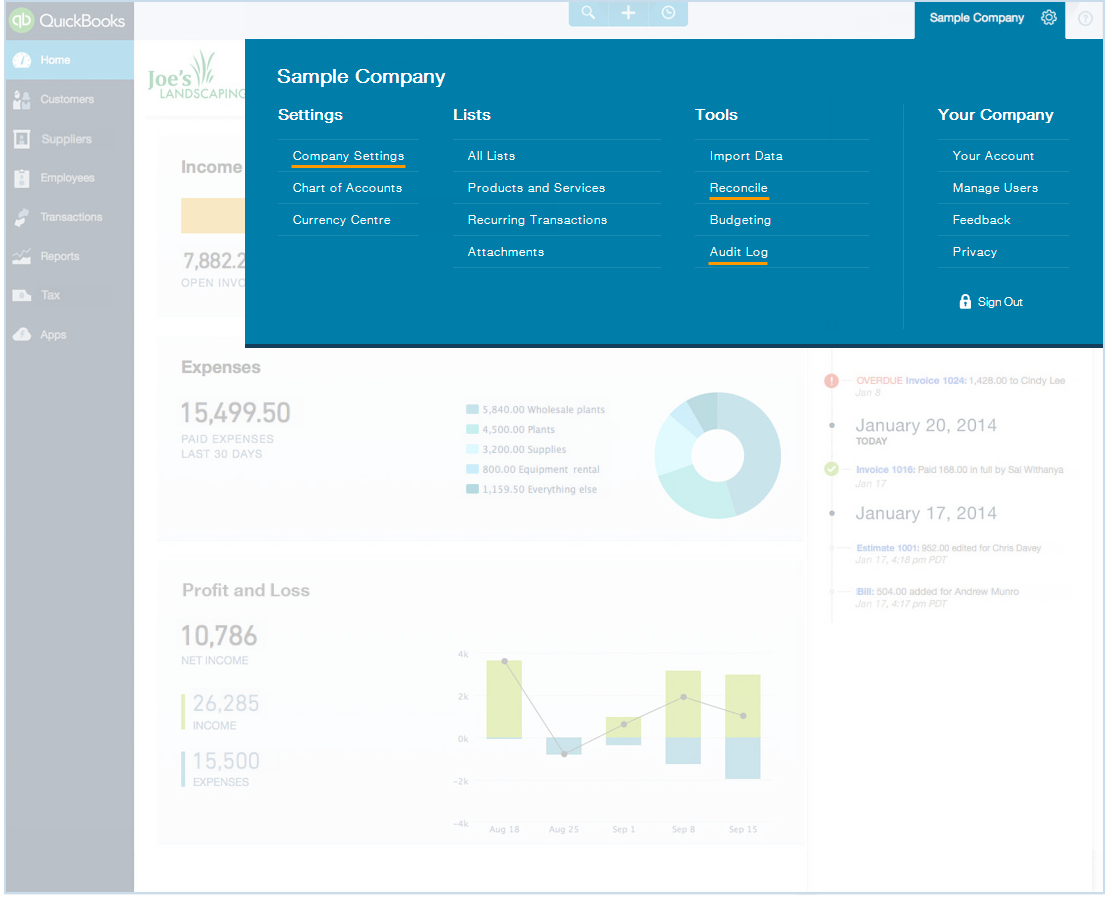
The Gear lets you manage tasks that you do less often, such as change company settings, manage your chart of accounts, set up products and services, or review recurring transactions.
It’s organised so that you can quickly get to tasks that involve your settings and your lists, use tools like import, reconcile, or budgeting, and manage the details of your account.
 QUICK TIPS
-
Preferences is now called Company Settings, and you’ll find it under Settings.
-
Activity Log has been changed to Audit Log (to be more in line with accounting industry standards), so look for it under Tools.
-
Reconcile is also in the Tools menu.
WHERE DO I FIND?
The New Customer Centre Page
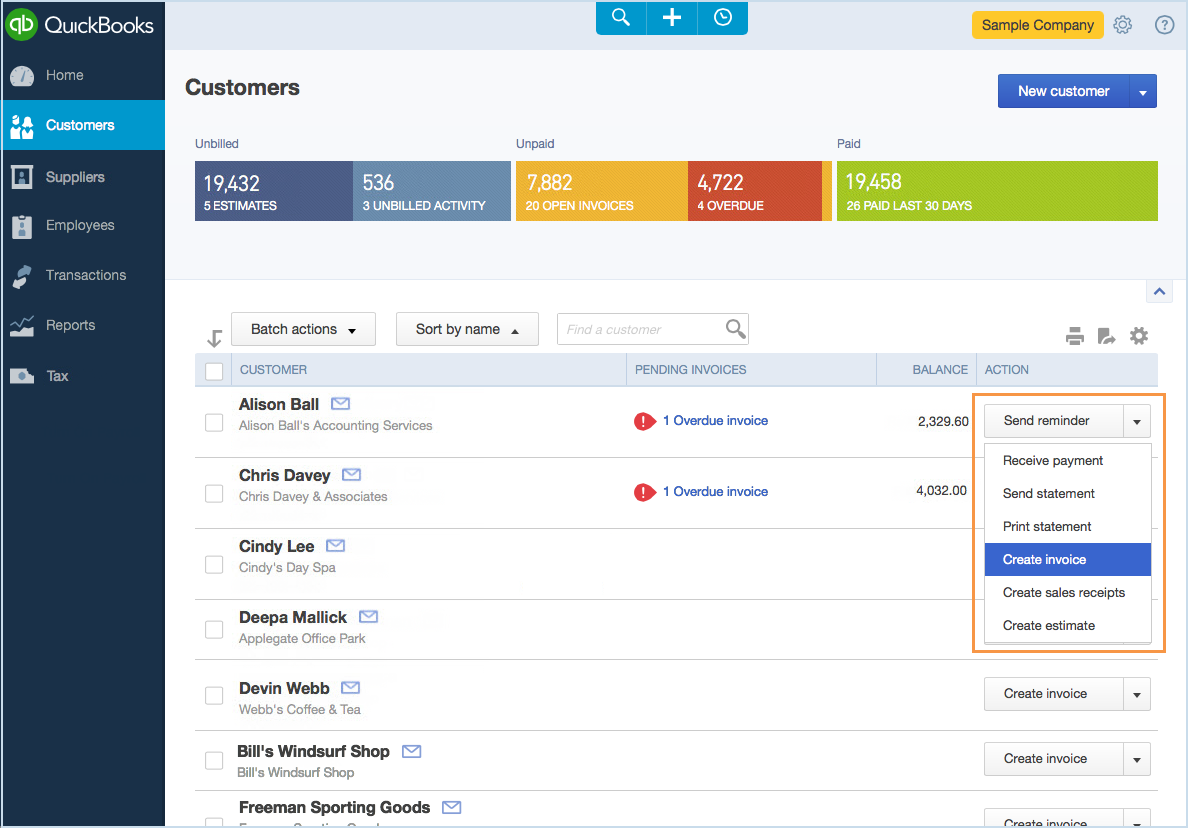
This page makes it easy to find customers and take the appropriate next action.
You’ll see more data here now, and quickly send emails and statements from the Batch actions dropdown.
The next recommended action is listed in the Action column, or you can open the dropdown to do other tasks, like receive a payment, create an invoice, or create an estimate.
WHERE DO I FIND?
The New Suppliers Centre Page
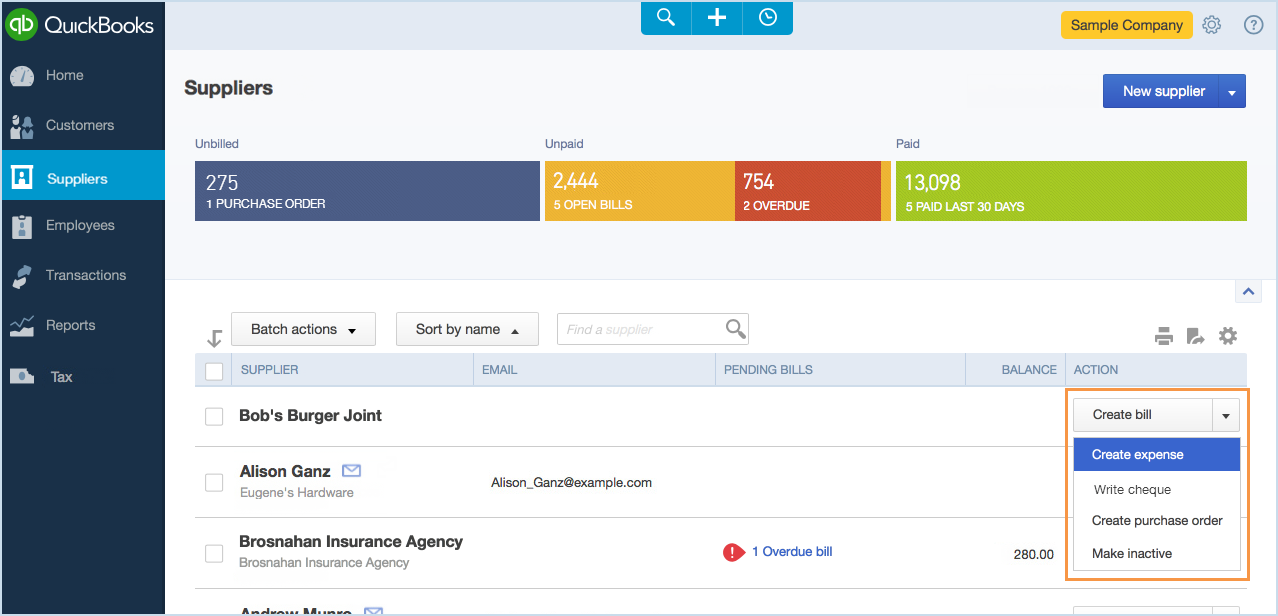
This page makes it easy for you to find suppliers, create a purchase order, write a cheque, and much more.
Now you can pay one supplier directly from the dropdown in the Action column. You can also choose the next recommended action, or open the dropdown and do other tasks like create an expense, or create a purchase order.
 QUICK TIP
Access all of your supplier forms (Expense, Cheque, Bill, and more), from the Create (+) menu.
WHERE DO I FIND?
My Employees
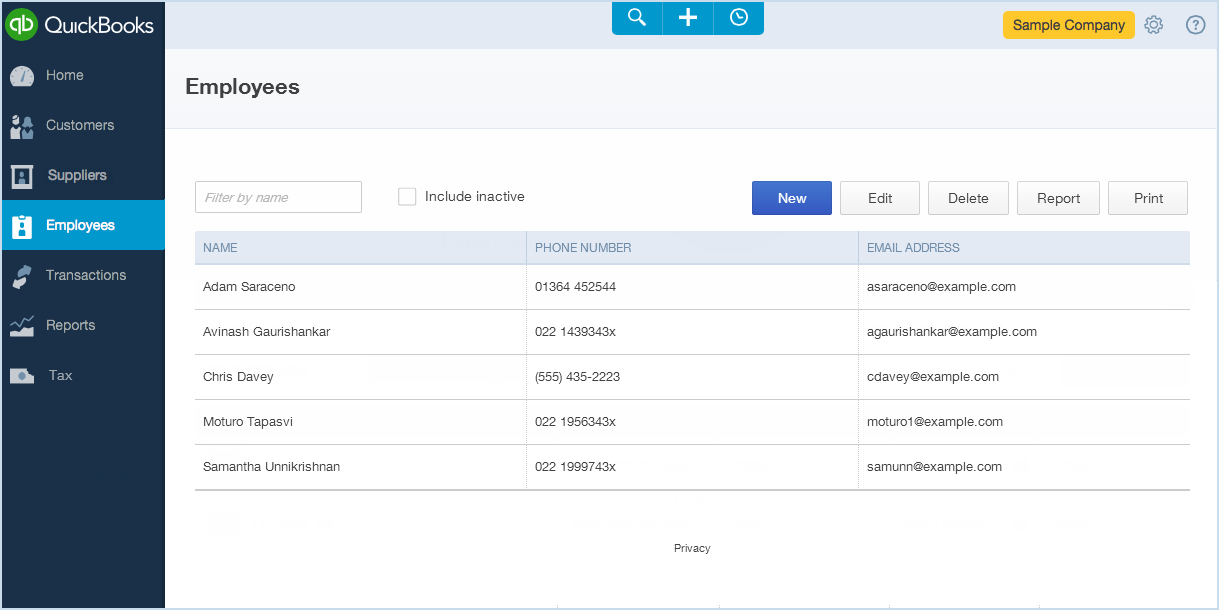
Use the Employees page to see a list of all of your employee information.
 QUICK TIP
Use the Create (+) menu to record Single Time or Weekly activities for your employees.
WHERE DO I FIND?
My Banking
It is
listed under Transactions in the navigation bar.
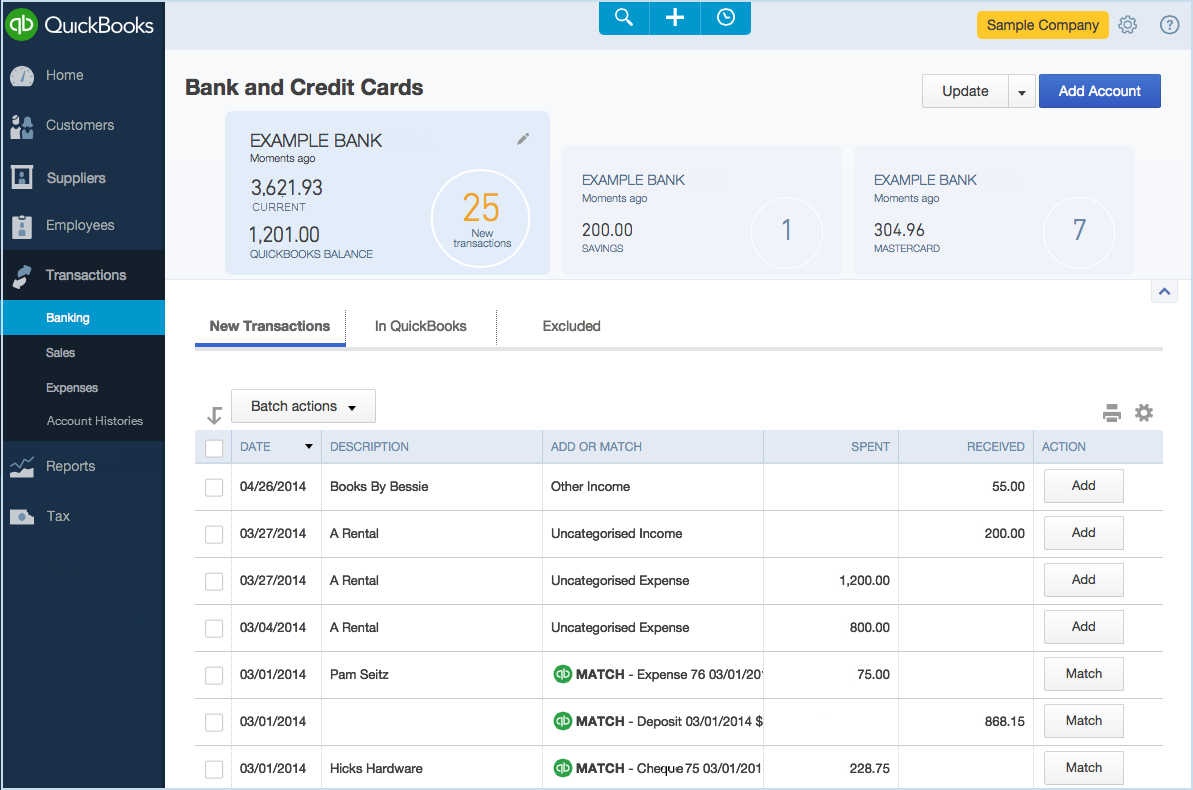
We have created a centralised location where you can manage all of your accounts. Just click Transactions to reveal Banking and select it to open the Bank and Credit Cards page.
To connect a bank account to your financial institution (so you can download electronic statements), click Add Account at the top right of the page. This was called either “download transactions” or “online banking” in your old QuickBooks.
 QUICK TIP
In the navigation bar you’ll also find Sales, Expenses, and Account histories.
WHERE DO I FIND?
Income List
It is
listed under the Transactions tab.
The Income List has been renamed “Sales,” and is grouped in the Navigation bar with other transaction lists.
 QUICK TIP
Click on the Money Bar to quickly sort your transactions.
WHERE DO I FIND?
My Reports
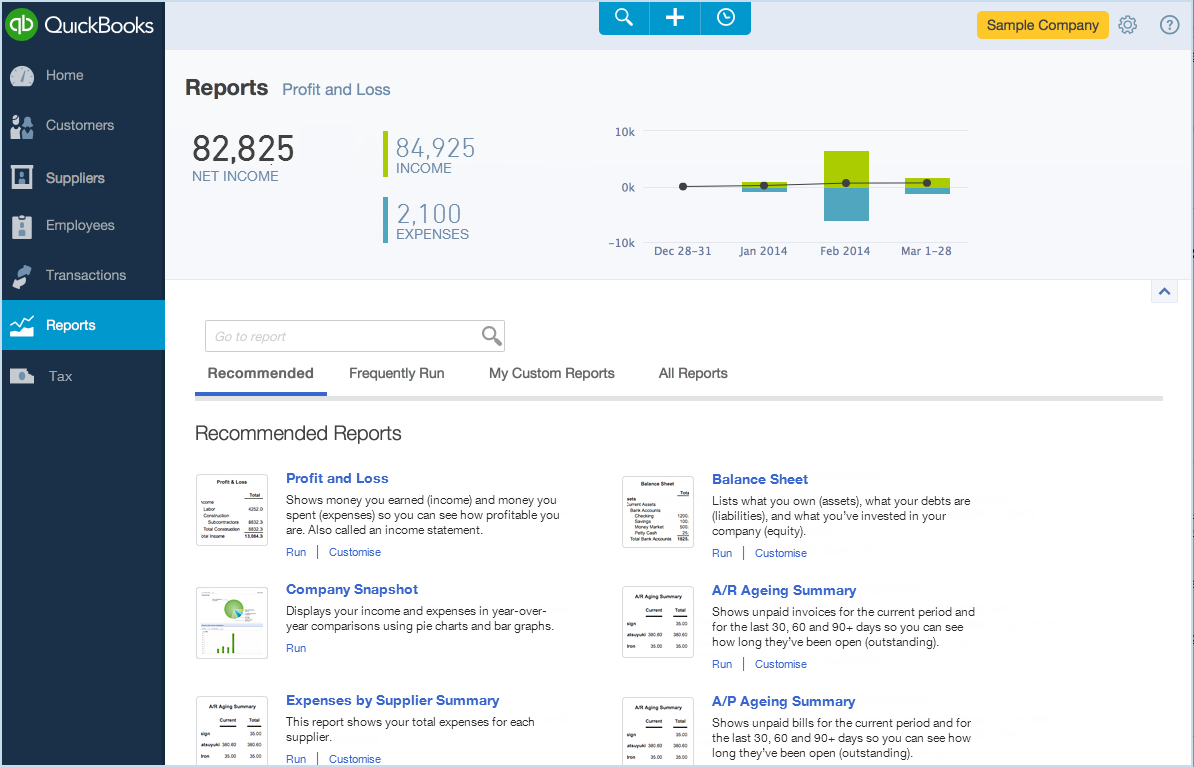
Use the Reports page to see an overview of your available reports.
Below the search bar are links for Recommended, Frequently Run, My Custom Reports, and All Reports. (Recommended Reports shows what reports other businesses like yours are running.) Use these convenient links to move quickly between different reports.
The new Reports page gives you a lot of flexibility. Search All Reports if you are not sure what you are looking for, go to My Custom Reports to view your memorised reports, and go to Frequently Run to view the reports you use most often.

DETAIL VIEW
 QUICK TIP
To find Scorecard, go to All Reports > Business Overview > Scorecard. Take some time to look around and see what else you can find.
WHERE DO I FIND?
My Lists
Click All Lists under the Lists column to find: Chart of Accounts, Recurring Transactions, Products and Services, Locations, Payment Methods, Terms, Classes, and Attachments.
Use the Gear icon to go directly to the lists you use most often. Just click the link (Products and Services, Recurring Transactions, or Attachments).
WHERE DO I FIND?
The Shortcut Keys
We know that shortcut keys are very important to some users. Press Ctrl+Alt+? to display an overlay with a list of keyboard shortcuts.
© 2014 Intuit, Inc. All rights reserved. Intuit and QuickBooks are registered trademarks of Intuit, Inc. Terms and conditions, features, support, pricing and service options subject to change without notice.
 The navigation bar
 The Create (+) menu
 The Gear icon


