QuickBooks Online Payroll: New and Updated Features
You asked and we listened! We're working hard to deliver some of the most commonly requested features for our QuickBooks Online Payroll customers. The following highlights some of the new and updated features recently released.
- Change payee name for payroll tax payments (Available to all customers the week of 12/20/2010.)
- Mark payroll tax payment as paid (Available to all customers the week of 12/20/2010.)
- Mark payroll expenses as cleared/reconciled (Available to all customers the week of 12/20/2010.)
- Set up expense accounts by wage and tax type (Released 12/3/2010)
- Set up a third-party designee (Released 12/3/2010)
- View payroll information by work location (Released 12/3/2010)
- Print paychecks and paystubs in a 3-part format (Released 10/29/2010)
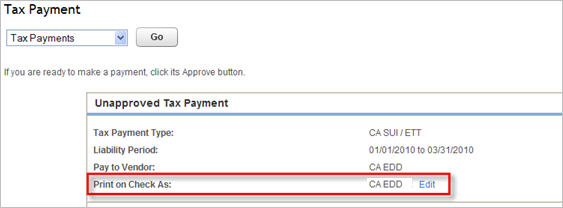
Change payee name for payroll tax payments
You can now edit the payee name that prints on your payroll tax payment checks. This is especially useful if you make your payroll tax payments to your financial institution rather than directly to the agency.
To do so:
- When you create and approve the tax payment, click the tax type. (You can also edit the Print On Check As info from the QuickBooks Online vendor list.)

- Click Edit next to the payee name in the Print on Check As field.
- In the Print on Check As field, enter the name you want printed on the check.
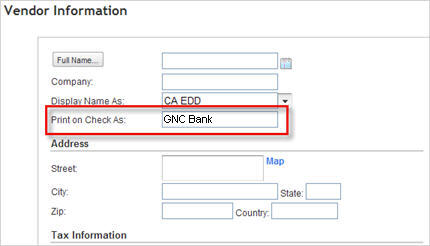
- Click Save. Now you can print the check with the new payee name and the name is saved for future tax payments you make to this vendor.
Mark payroll tax payment as paid
You can now mark a manual tax payment "paid" by clearing the To be printed checkbox before approving the payment.
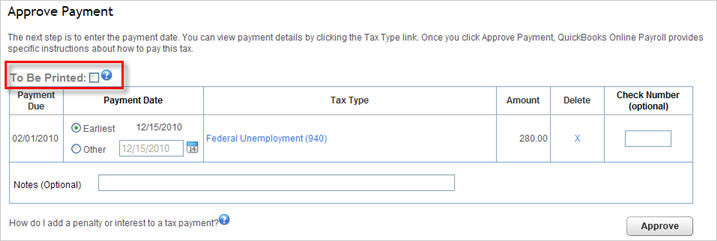
When you clear the To be printed checkbox, the payment won't appear in your Print Check page, which is handy if you make your payments electronically outside of our payroll system or if you want to handwrite a check to the tax agency.
Mark payroll expenses as cleared/reconciled in the register
Now you can mark payroll transactions cleared (C) or reconciled (R) in the QuickBooks Online Bank Register, just as you can do for other QuickBooks Online transactions.
To do so:
- Click the Banking tab.
- Click Registers.
- In the Go to Registers window, click the Register Name drop-down arrow, select the bank account you want to display, and click OK.
- Find and select the transaction that you want to clear, unclear, reconcile or unreconcile.
-
In checkmark column (next to Deposit), click the top line of the transaction to select it.

-
Click in the field to cycle through the statuses:
- Blank. The transaction has not been cleared or reconciled.
- C. The transaction has been cleared.
- R. The transaction has been reconciled.
- Click Save and then confirm the changes.
Set up expense accounts by wage and tax type
You can set up your accounting preferences so that wages and taxes appear in separate expense accounts within your chart of accounts or in reports, and you can see the wage and tax information itemized by wage or tax type.
Important! We recommend that you wait until you close out your payroll for the year or consult with your financial advisor before setting up different expense accounts for your wages and taxes.
To do so:
- Click the Employees tab.
- Click Payroll Setup.
- In the Preferences section, click Accounting.
- On the Accounting Preferences page, click Customize. The Wage Expense Accounts and Tax Expense Accounts sections are separate.
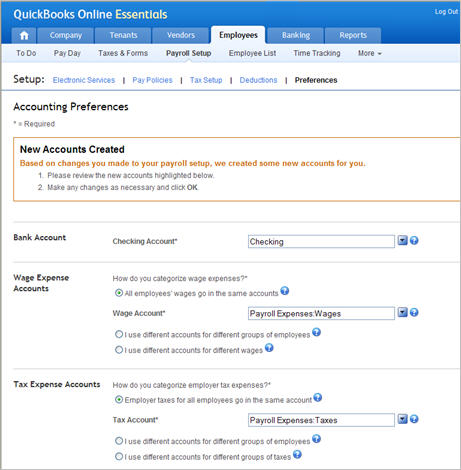
- Click the I use different account for different... option in the appropriate section to see your payroll expense accounts itemized by wage or tax type. For example, if you want to use different accounts for different wages, select the option. QuickBooks Online Payroll displays each wage (or pay) type.
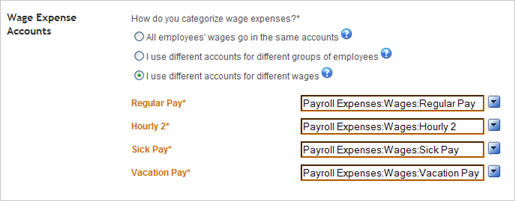
- Click OK to save the new accounting preference setup.
Set up a third-party designee
You can authorize your financial advisor to discuss your 941 and 940 returns with the IRS. To do so:
- Click the Employees tab.
- Click Payroll Setup.
- In the Taxes section, click Third Party Designee.
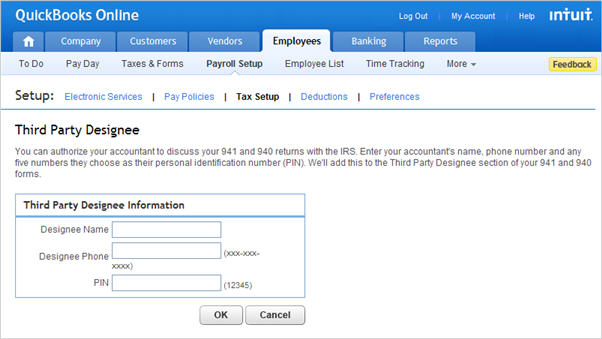
- Enter your accountant's name, phone number and any five numbers they choose as their personal identification number (PIN). We'll add this to the Third Party Designee section of your 941 and 940 forms.
- Click OK.
View payroll information by work location
You can view payroll information by work location. For example, if you want to see payroll details for employees who work in your Mountain View office, you can run a Payroll Details report, select the work location address for your Mountain View office from a drop-down list that contains all of your company work locations, and then click Update Report.
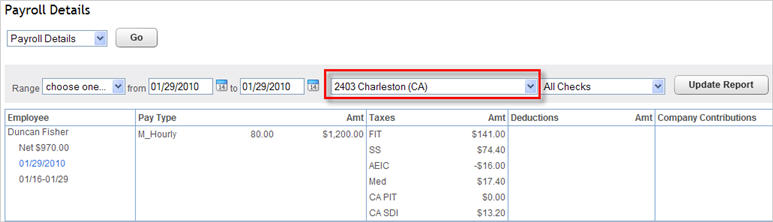
The following payroll reports include the work location option:
- Payroll Summary
- Payroll Details
- Total Cost
- Employee Details
- Total Pay
- Directory
Print paychecks and paystubs in a 3-part format
You can print paychecks and paystubs in a 3-part format. Now when you print paychecks on perforated, QuickBooks-compatible voucher stock, you can give the employee the check and paystub and keep the bottom paystub for your own records!
To set up 3-part paycheck/paystub printing:
- Sign in to your QuickBooks Online Payroll account.
- Go to the Employees menu and click Payroll Setup.
- On the Setup Overview page, click Preferences.
- On the Preferences page, click Paycheck Printing.
- On the Paycheck Printing Settings page, click Preprinted QuickBooks-compatible voucher check stock.
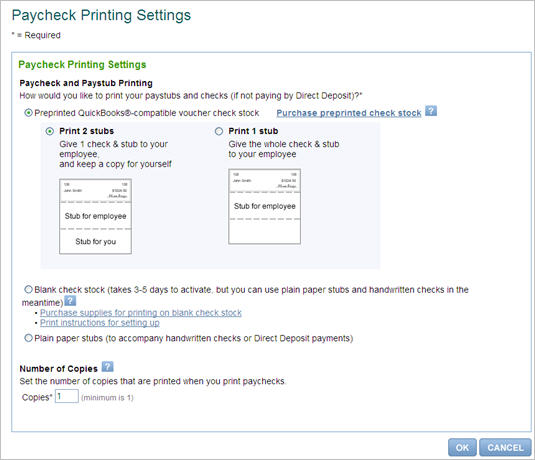
- Click Print 2 stubs.
- Click OK.
Before you print paychecks, we strongly recommend that you test and adjust the check alignment. For detailed instructions, sign into QuickBooks Online, then click the Help link at the top of the main window; under step 2, click Payroll; under step 3, type test check alignment in the box, and then click Search.
Have questions?
If you have any questions, we're here to help! Click Contact Us at the bottom of any page in your QuickBooks Online Payroll account for support options and hours.